 Hey everyone! Due to overwhelming request I have decided to post a bit of the "Behind the Scenes" process of making my Muppet Theatre and Backstage Playsets. First off, thank you so much for all the comments and feedback, im so glad that the Muppets are still holding a magical place in the heart of so many people. I have included a sneak peek at my next Muppet Theatre "Add-On" project at the end of the post! Thanks again and please enjoy the pics and comments.
 |
| It all starts with an idea and a design. Here I am planning the size of each panel. |
 |
| After I designed the panels I planned out how much trim I would need. |
 |
| Colors are important as well |
 |
| Here I am testing materials for the Baroque paneling |
 |
| Various trims and moldings purchased from a dollhouse store. Model is 1" scale and most dollhouse items are as well |
 |
| Close up of trim planning. The design is a copy of the Muppet Show Theatre |
 |
| I looked to actual British style theatre doors since the series was designed in the UK. This one was perfect! |
 |
| Back wall was created before assembly. I painted the brick mortar on first. |
 |
| Here I am laying down the stickers before I add the concrete |
 |
| Ready to be covered in concrete |
 |
| After I spread on the concrete I pulled off the sticker and the mortar was revealed! So easy and effective. |
 |
| Close up of brick work |
 |
| Door before it was painted. I created the seams in the illustration board with pen |
 |
| Time for a fitting |
 |
| Trim around door made from foam core |
 |
| Primed Back first |
 |
| Painted Green, very Muppet! |
 |
| With the leftover concrete I made a Muppet half wall |
 |
| I used a dremel (every crafter should have one) to simulate the stone look in the illustration board |
 |
| Close up of stone treatment with spatter paint finish (Just like the Muppet original) done with paint and toothbrush |
 |
| Looks so cool!! |
 |
| Creating stencils for the door. I printed the words out in the right size, glued it onto paper and cut with craft knife. |
 |
| This was difficult, but in the end it looks good |
 |
| After It is painted on |
 |
| Brick get painted and aged, as well as the door. |
 |
| The floor board are maple wood flooring purchased at a miniature store, cut to fit ,stained, then aged. |
 |
| The panels are painted first on to the MDF wood (1/8th inch) |
 |
| Here is the beginning of the baroque paneling |
 |
| the pattern is glued on |
 |
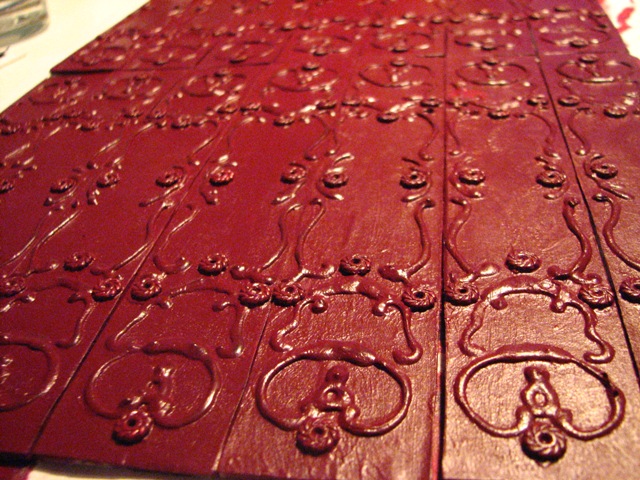
| I then used 3D puffy paint and craft store beads to simulate the design |
 |
| I think it wirked very well! |
 |
| Testing out the patterns...its all coming together |
 |
| Bottom trim design |
 |
| Then all parts are primed with the Scarlet paint color |
 |
| Ghost light was hand made from an old dollhouse lamp |
 |
| I hand crafted the top part with craft wire |
 |
| I then hand painted the trim with gold leaf paint |
 |
| This is difficult detailed work requiring lots of patience |
 |
| Many panels later |

 |
| Getting closer |
 |
| I assembled all the trim together and primed it to prepare for gold spray paint. This was a faster solution |
 |
| I used half inch square posting for the structure |
 |
| Floor goes in |
 |
| back wall is added |
 |
| bit by bit it comes together |
 |
| Here is the corner trims painted |

 |
| Front is put on |
 |
| Almost done. Im sorry I skipped a few steps...but I got too involved in the building to pick up the camera, lol. |
 |
| Still much to be done, but its looking very Muppet Theatre! |
 |
| Here is a bit of the backstage Kit bashing Process. |
 |
| Lots of trim pained green first |
 |
| I knew this playset needed more height. I made sure it matched up with the theatre |
 |
| Me painting the brick work |
 |
| I matched the bricks to the existing ones in the playset. |
 |
| Fitting the wall in. It is made out of foam core. |
 |
| Top view |
 |
| Here i am seeing if it fits |
 |
| Close up on the lights I added from a dollhouse store. |
 |
| A few props I purchased, and painted in the Muppet Color Scheme |
 |
| I also thought Rowlf need a stand up Piano, so I made him one! |
 |
| The posters from the theatre back wall, getting treatment. I printed these off the internet in the right scale. |
 |
| Here is a sneak peek at my next project, the Box Seats of Statler and Waldorf! The top will be the box seats and the bottom will be the audience entrance and a place to showcase scooter and his popcorn machine! It will fit beside the Theatre perfectly! |
Thanks again for checking out my blog, please become a follower and keepm up to date with my current projects!
Lance